

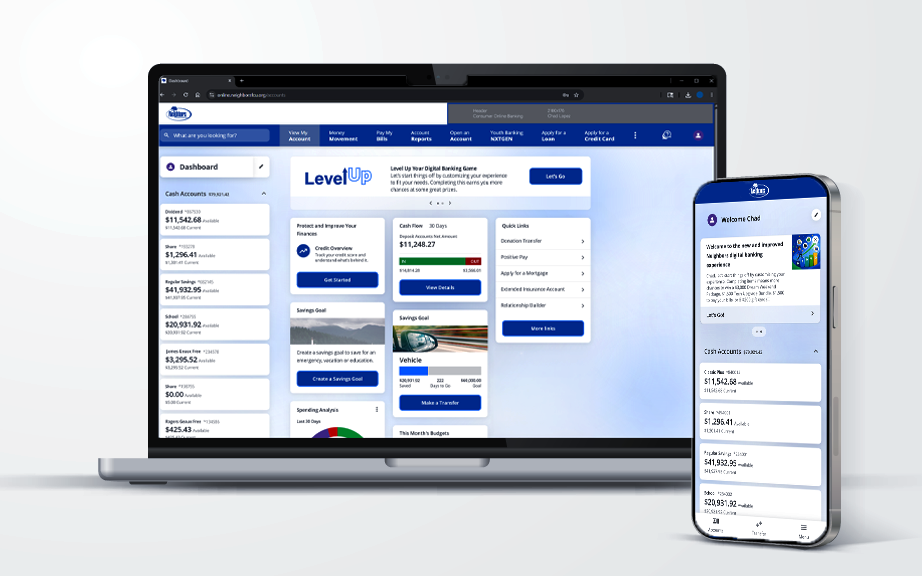
Introducing The New Neighbors Digital Banking
Enjoy improved features, enhanced navigation, and an all-around better experience.
A Better Banking Experience Is Here
Literally Everything Is Better
From navigation to security tools to budgeting features, we've improved all aspects of our digital banking and we'll be adding new features along the way.
More convenience. More control.
Neighbors members can now enjoy a refreshed online and mobile banking platform designed to make everyday banking easier, faster, and more personalized.
Everything You Love, Plus Some
You’ll still have the features you already know and trust, plus new tools built to give you even more control over your finances.
This is more than just an update.
It’s a smarter, more intuitive way to bank.
New Digital Banking FAQs
We’ve upgraded your online and mobile banking experience to make managing your money easier, faster, and more secure.
Neighbors FCU is upgrading online banking for a more efficient, user-friendly, effective system that keeps up with today’s ever-changing technological banking landscape
- Digital banking will have view only access beginning 7/13 at 12:00 a.m.
- Bill Pay access will stop on 7/6. However, payments will continue to be made
- Last internal transfers will occur on 7/12 at 5:30 p.m.. Any transfers for 7/13 will occur on 7/14.
- Zelle will be unavaialbe beginning 7/13 at 12:00 a.m.
- External transfers will stop on 7/13.
No. Simply log in using your existing credentials, then complete a quick first-time sign-in to reset your password. You’re welcome to reuse your previous password if you’d like.
Your username will stay the same.
For security, you'll be asked to reset your password the first time you log in. If you prefer, you can create a new one or keep it the same.
Your upgraded online banking will be available on July 14, 2026.
No problem. Use the “Forgot Username” or “Forgot Password” links, or contact us and we’ll help you get back in quickly.
Yes. Your accounts, balances, and transaction history will all be there when you log in.
You may need to re-connect any external accounts. Once you’re in, just follow the quick checklist to make sure everything is set up the way you want.
You'll be able to:
- Customize your dashboard so what matters shows first
- Manage your cards in one place
- Set savings goals and track progress
- Message us securely inside digital banking
- Enjoy a modern, streamlined experience across devices
No. Your current app is simply getting an upgrade — no download required.
If you’ve saved the login page, you’ll need to delete that bookmark and access online banking through our updated website. Once you’re there, be sure to save the new page for easy access going forward.
Yes. Security is a top priority. This upgrade adds enhanced protection to help keep your information safe.
We’re here for you. Call us at 225-819-2178, stop by one of our branches, or send us a secure message once you’re logged in.
12 Months of history will be available after the upgrade.
You will not need to re-enroll. The information below will still be available with the upgrade.
- Payees
- 12 Months Payment History
- Scheduled payments (one-time)
- Scheduled payments (recurring)
Yes, your scheduled bill payments will continue to be made.
Yes, all bill pay merchants will be in the upgraded system
- Internal transfers will not need to be rescheduled
- External accounts and transfers will need to be set up in the upgraded system
New accounts can take up to 24 hours to appear in Online Banking. If the account has not appeared within 24 hours, please contact member services via the secured message portal or by phone at 225-819-2178
Your account information is updated in real-time
- Log into digital banking via a web browser or the Neighbors mobile app.
- Click on your Profile Picture/icon
- Select Security from the drop down menu
- On the Security Validation page, select Change Username
- Note: You may be prompted to verify your identity using a confirmation code that you choose to receive via text phone call. If you have push notifications set up you will verify using this method. Once you have entered and submitted the confirmation code, you will be directed to the Change User ID page
- Enter and confirm your New User ID
- User ID Requirements
- Have between 8-32 characters
- Only contain alphnumeric characters
- Contain at least one number
- Contain no whitespace
- User ID Requirements
- Select Update
- Log into your digital banking account via web browser or the Neighbors app
- Click on your profile picture/icon
- Select Security from the drop down menu
- Click the Change Password link to quickly and safely change your password
- Click the Forgot Password lin located on the login page
- Enter your User ID, date of birth in MM/DD/YYYY format and the last 4 digits of your Social Security Number
- You will be prompted to select how you would like to receive your identity verification confirmation code, by text or phone call
- If you do not have access to any of the listed phone numbers, please contact Member services at 225-819-2178
- Once you enter and submit your confirmation code, you will be prompted to create a new password
- Your new password must contain the following
- Have between 8-32 characters
- Contain at least one letter
- Contain at least one number
- Contain at least one of the following special characters @!#$%&
- Not contain whitespace
- Your new password must contain the following
- Log into your digital banking via a web browser or the Neighbors mobile app
- Click on the account you would like to rename
- In the Account Details box on the right, click View Account Details
- Select the tag next to the account name
- Enter a new nickname
- Click Update
- Log into your digital banking via a web browser or the Neighbors mobile app
- Select the three dots on the navigation banner and select Alerts from the drop down menu
- Choos the alert type you would like to set up and follow the prompts
- Select Save
- Note: There are no limits to the number of alerts a user may set up
Neighbors digital banking offers basic three basic types of alerts. Each alert type has a variety of options available.
- Subscription Alerts (transaction, balance, etc.)
- Balance Summary
- Check Cleared
- Transaction
- Courtesy Pay
- Security Alerts
- Log In
- Internal and External Transfers
- Text
- Push Notifications
Yes. Alerts are provided in real-time
Yes, Neighbors offers a variety of ways to transfer money to and from your account
- Log into your digital account via a web browser or the Neighbors mobile app
- Click Money Movement in the navigation bar
- In the menue choose External Accounts
- Verify your identity through the prompts provided
- Once you have verified your identity choos how you would like to add your external account
- Enter your account information for your external account and start transferring!
No, you will not be able to transfer money to an inactive account in online banking. Please send a secure email via Online Banking, contact member services at 225-819-2178 or visit a branch.
- Log into your digital banking account via a web browser or the Neighbors mobile app
- Click on your profile picture/icon
- Select Profile from the drop down menu
- Under Profile Details, update your contact information
There may be several reasons why you are unable to access your online banking. If you need assistance, please call us at 225-819-2178 or visit a local branch.
You can view up to 12 months of transaction history.
We have security measures in place that check multiple factors and patterns to determine the person logging in is you. With the upgraded system, you will also be able to view your login activity.
Emails will be answered by the end of the next business day.
You can pay bills, make transfers, receive account alerts, and much more!
Neighbors digital banking supports the latest versions of the folloing browsers:
- Internet Explorer
- Google Chrome
- Microsoft Edge
- Mozilla Firefox
- Safari
No, you do not have the ability to accesss your business accounts through your personal digital banking.
They occur daily (including weekends and holidays) at 5:30 p.m.
- Log into your digital banking account via a web browser or the Neighbors mobile app
- Click the three dots in the navigation bar
- Choose Documents and Statements from the drop down menu
Your user ID remained the same. If you are having issues logging in, please select Forgot User Name on the login screen or contact us at 225-819-2178
The upgraded app and older app look different. The updated app icon is white with a blue Neighbors tree logo. The old app icon is blue with a white Neighbors logo.
If Neighbors Online Banking system goes down, it will still attempt to process your payments and scheduled transfers. However, if the payment or transfer is not successful, you will receive an email that it has failed. If you receive an email that your payment or transfer has failed, please log into online banking and initiate a single transfer to cover for the one that failed.
Yes
Please contact Neighbors Federal Credit Union to perform this request. You can call us at 225-819-2178 or 866-819-2178. You can also send a secure email through online banking.
If the text in your app looks unusually large, your phone’s accessibility settings may be adjusted. iOS Open: Settings, Accessibility, Per App Settings, Larger Text Adjust the text slider to reduce font size for the app only
Open: Settings and search for “Font size” or “Accessibility,” Adjust the system font size or display size settings, Optionally check Chrome-specific font settings if needed
- Connect to Wi-Fi. While it’s possible to automatically update apps over cellular data, we recommend using Wi-Fi instead. Apple iOS usually downloads updates only over Wi-Fi. Make sure your iPhone spends long periods of time connected to the Internet on a stable Wi-Fi network. This provides plenty of opportunities for it to download and update apps or software.
- Connect to power. Your iPhone will not download and install software updates if the battery is low. Keep your iPhone charged to at least 50 percent to encourage automatic software and app updates.
- Check your iPhone compatibility. If you’re waiting for a particular app or iOS update to install, it’s worth checking that your iPhone is compatible with that software. After all, you will wait a long time for an automatic software update that isn’t available for your device.
- Check your storage. Your iPhone may have stopped updating apps and software automatically because there isn’t enough free storage. This happens when you use too much space for existing apps, videos, music, and other media.
- Check for Apple server problems. Automatic iPhone software updates may not work due to an issue with Apple’s servers. If Apple’s servers are down, your iPhone can’t download updated software from them.
Quicken Conversion Instructions
As we complete our system upgrade, you will need to modify your Quicken settings to ensure that your data connectivity transfers smoothly. Below you will find instructions for both Windows and Mac, and both connectivity types (Express Web Connect or Web Connect).
IMPORTANT: Express Web Connect will not be available until 5 business days after the 2nd Action Date, so please utilize another connectivity type if you need transaction updates during this downtime.
IMPORTANT: Express Web Connect will not be available until 5 business days after the 2nd Action Date, so please utilize another connectivity type if you need transaction updates during this downtime.
On the 1st Action Date: 7/12/26
- Backup Quicken Windows Data File and Update.
- Choose File > Backup and Restore > Backup Quicken File.
- Download the latest Quicken Update. Choose Help > Check for Updates.
- Complete a final transaction download.
- Complete last transaction update before the change to get all of your transaction history up to date.
- Repeat this step for each account you need to update.
- Accept all new transactions into the appropriate registers.
- Deactivate online banking connection for accounts connected to financial institution that is requesting this change.
- Choose Tools > Account List.
- Click Edit on the account to deactivate.
- In Account Details, click Online Services.
- Click Deactivate. Follow prompts to confirm deactivation.
- Click the General tab.
- Delete Financial Institution and Account Number information.
- Click OK to close window.
- Repeat steps for any additional accounts.
- Reconnect online banking connection for accounts that apply.
- Download a Quicken Web Connect file from your financial institution’s online banking site.
- In Quicken, choose File > File Import > Web Connect (.QFX) File.
- Use the import dialog to select the Web Connect file you downloaded. An “Import Downloaded Transactions” window opens.
- Choose Link to an existing account. Select the matching account in the drop-down menu. Associate the imported transactions to the correct account listed in Quicken.
- Repeat this step for each account you have connected to this institution.
On the 1st Action Date: 7/12/26
Activate online banking connection for accounts connected to financial institution that is requesting this change.
- Backup your Quicken Mac data file and update the application.
- Choose File > Save a Backup.
- Download the latest Quicken Update. Choose Quicken > Check for Updates.
- Complete a final transaction download.
- Complete last transaction update before the change to get all of your transaction history up to date.
- Repeat this step for each account you need to update.
- Accept all new transactions into the appropriate registers.
Activate online banking connection for accounts connected to financial institution that is requesting this change.
- Select your account under the Accounts list on the left side.
- Choose Accounts > Settings.
- Select Set up transaction download.
- Enter your financial institution name in the search field, select the correct option and click Continue.
- Log into your financial institutions online banking site and download your transactions to your computer.
Important: Take note of the date you last had a successful connection. If you have overlapping dates in the web-connect process, you may end up with duplicate transactions. - Drag and drop the downloaded file into the box titled Drop download file. Choose Web Connect for the “Connection Type” if prompted
- In the “Accounts Found” screen, ensure you associate each new account to the appropriate account already listed in Quicken. Under the Action column, click Link to pick your existing account.
Important: Do NOT select “ADD” in the Action column unless you intend to add a new account to Quicken. - Click Finish.